Video walkthrough
How the pieces connect
Scale
RS-232 serial output
USB to RS-232 cable
Male DB9 end to the scale
USB-C dock
Android only
VahaPOS Scale app
Android tablet, or Windows, macOS, Linux
Internet
Secure stream to our server
Shopify POS tile
Live weight, tap to add
Direct scale or kiosk?
| Direct (this guide) | Kiosk | |
|---|---|---|
| Who weighs | Staff, at a served counter | The customer, unattended |
| Label printer | Not needed | Required |
| At the till | Weight is already on the POS screen | Staff scan the printed label |
| Best for | Deli, butcher, any staffed counter | Self-serve produce or pick-and-mix |
Running a self-service counter instead? Read the kiosk guide
What you need
| Item | What it is |
|---|---|
| 1. Scale | A supported scale with RS-232 output. See the models below. |
| 2. Cable | For a serial scale, a UGREEN USB to RS-232 cable with a male DB9 connector. |
| 3. USB-C dock | Only for Android. Any Android-compatible dock; we use the UGREEN RevoDock 6-in-1. |
| 4. Companion device | Android tablet, or a Windows, macOS or Linux machine running the VahaPOS Scale app. |
| 5. Internet | The companion app streams the weight to our server. |
| 6. Shopify POS | iPad or Android showing the live weight in the VahaPOS tile. |
| 7. VahaPOS plan | Plus (1 scale), Minimarket (2 scales) or Supermarket (10 scales). |
Supported scales for Shopify POS
The app connects over USB serial, TCP/WiFi or Bluetooth, and ships profiles for these models. Serial scales need an RS-232 port. Many models are sold in both a plain and an RS-232 version, and only the RS-232 one can send weight out.
| Profile | Notes |
|---|---|
| Generic / Auto-detect | Try this first if your model is not listed. Reads any line-based ASCII output. |
| CAS (Generic) and CAS PD-II | The CAS SW-10RS (10 lb) is our recommendation. PD-II uses the continuous 17-byte protocol. |
| Bizerba | Serial output models. |
| OHAUS | Serial output models. |
| Dibal | Serial output models. |
| US Solid (USS-DBS61-32) | Fixed-column output; stability is worked out by the app. |
| Custom | For an unlisted scale: set the frame terminator and a weight pattern yourself, with a debug terminal to watch raw data. |
Choose the companion device
| Android | Windows, macOS, Linux | |
|---|---|---|
| Scales per device | One | Several |
| Runs alongside Shopify POS | Yes, on the same tablet in the background | Separate machine |
| Needs a USB-C dock | Yes | No, connect the cable directly |
| Best for | A single counter | Multiple counters from one machine |
Download the VahaPOS Scale companion app
Android
- VahaPOS Scale v1.3 (APK) one scale per device
Windows
- Windows installer recommended
- Windows x64 (portable)
macOS
Linux
- Debian / Ubuntu (amd64) .deb package
- Debian / Ubuntu (arm64) .deb package
- Linux x64 (portable)
- Linux arm64 (portable)
Step 1: Create the scale device in your admin
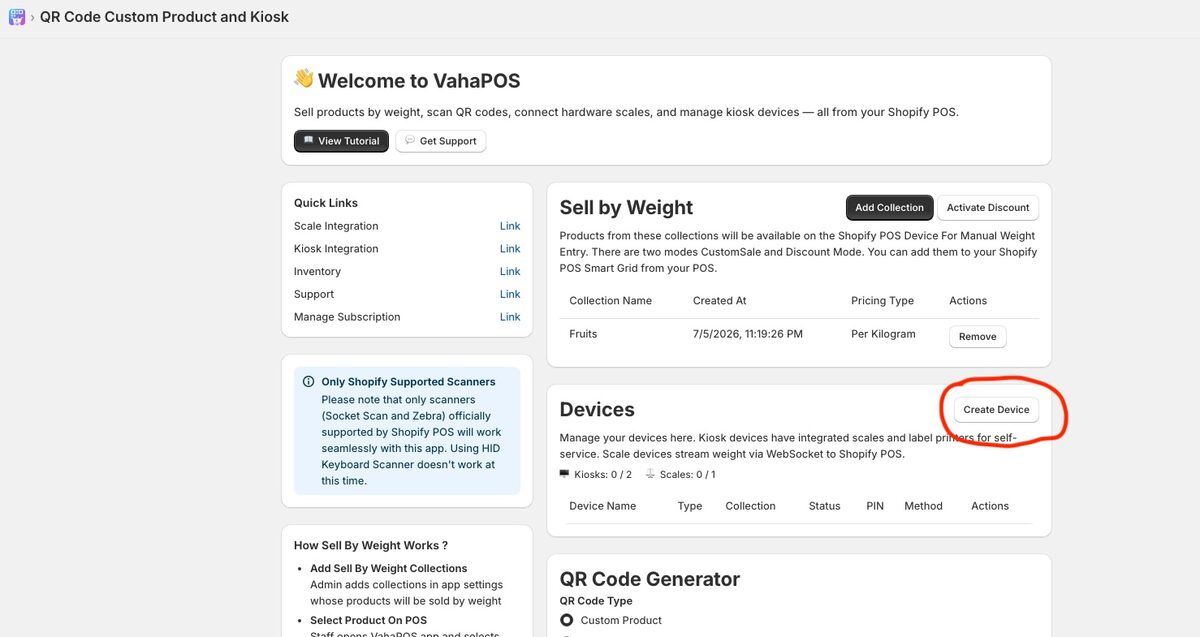
Step 1: On the VahaPOS dashboard, choose Create Device.
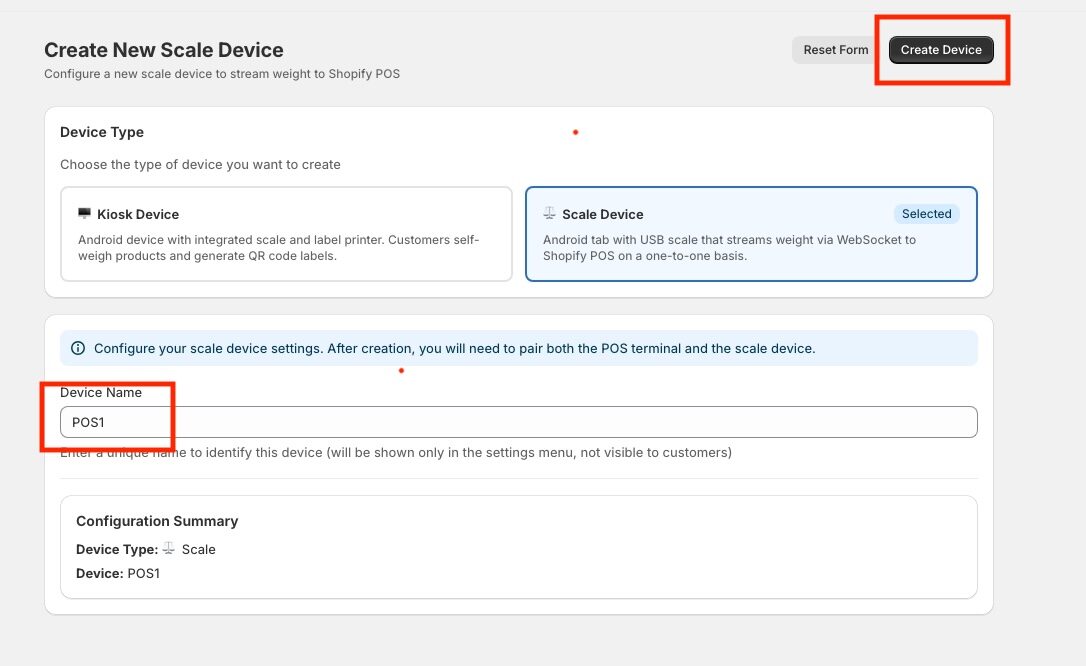
Step 2: Select Scale Device, give it a name, then Create Device.
The name is only shown in settings menus, never to customers.
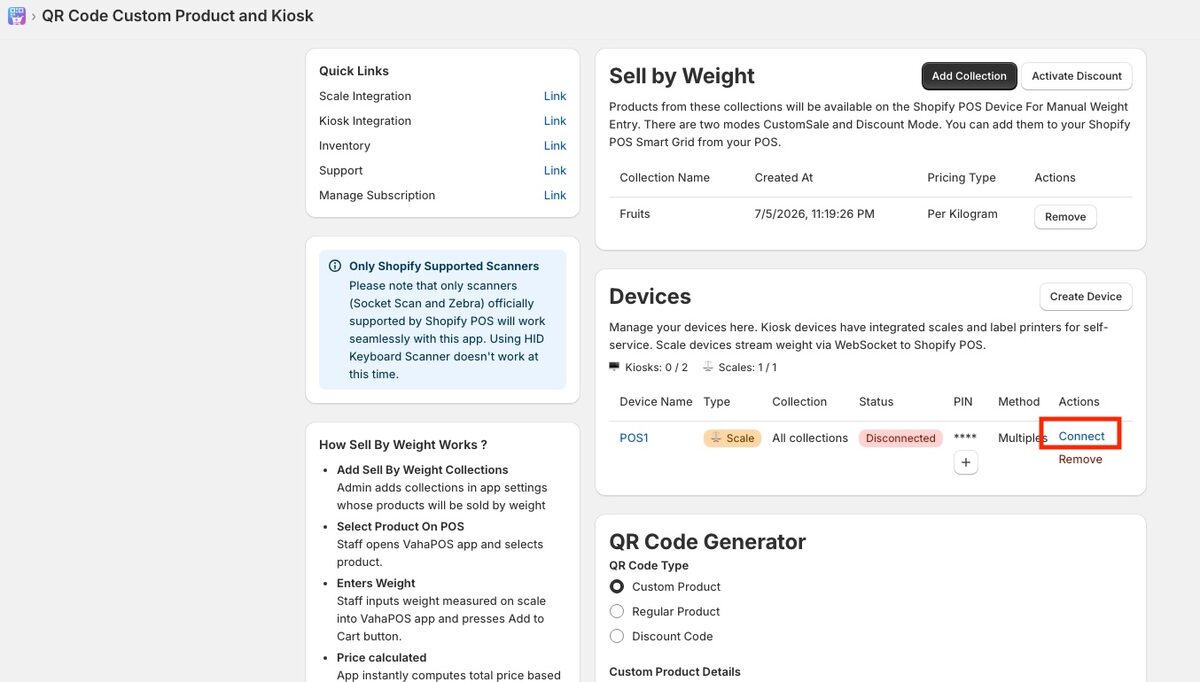
Step 3: The device is listed as Disconnected. Choose Connect.
Collection reads All collections. A scale serves products from every collection you configured, so there is nothing to pick.
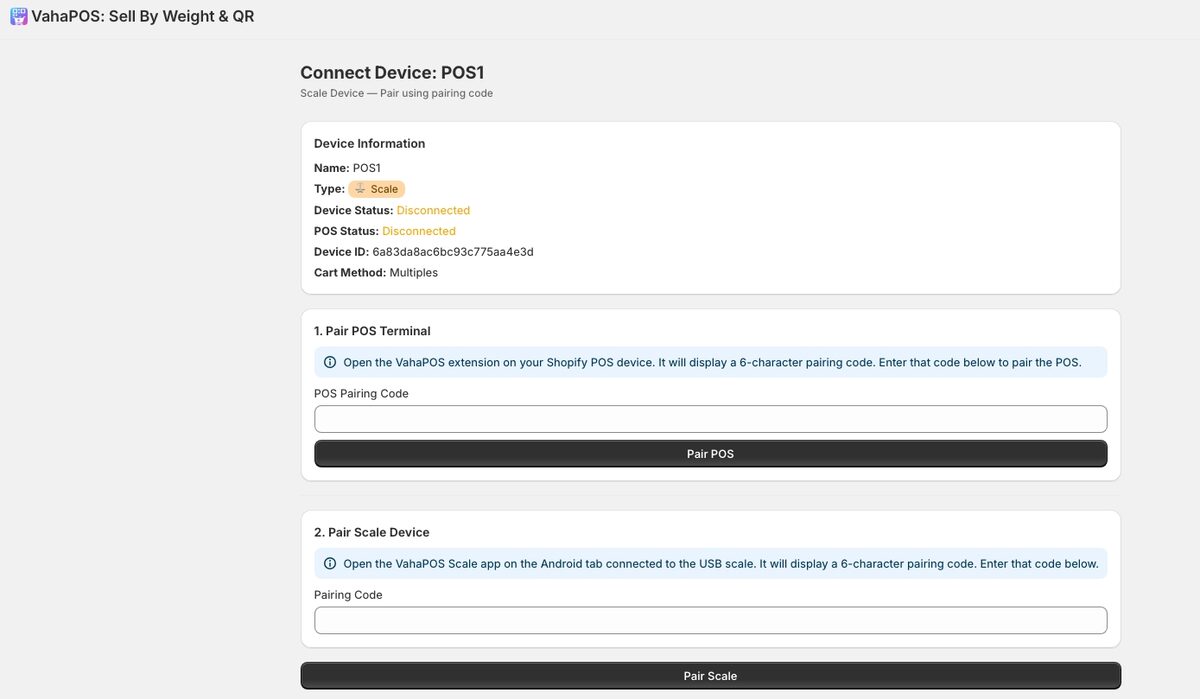
Step 4: Leave this page open. Both pairing codes get entered here.
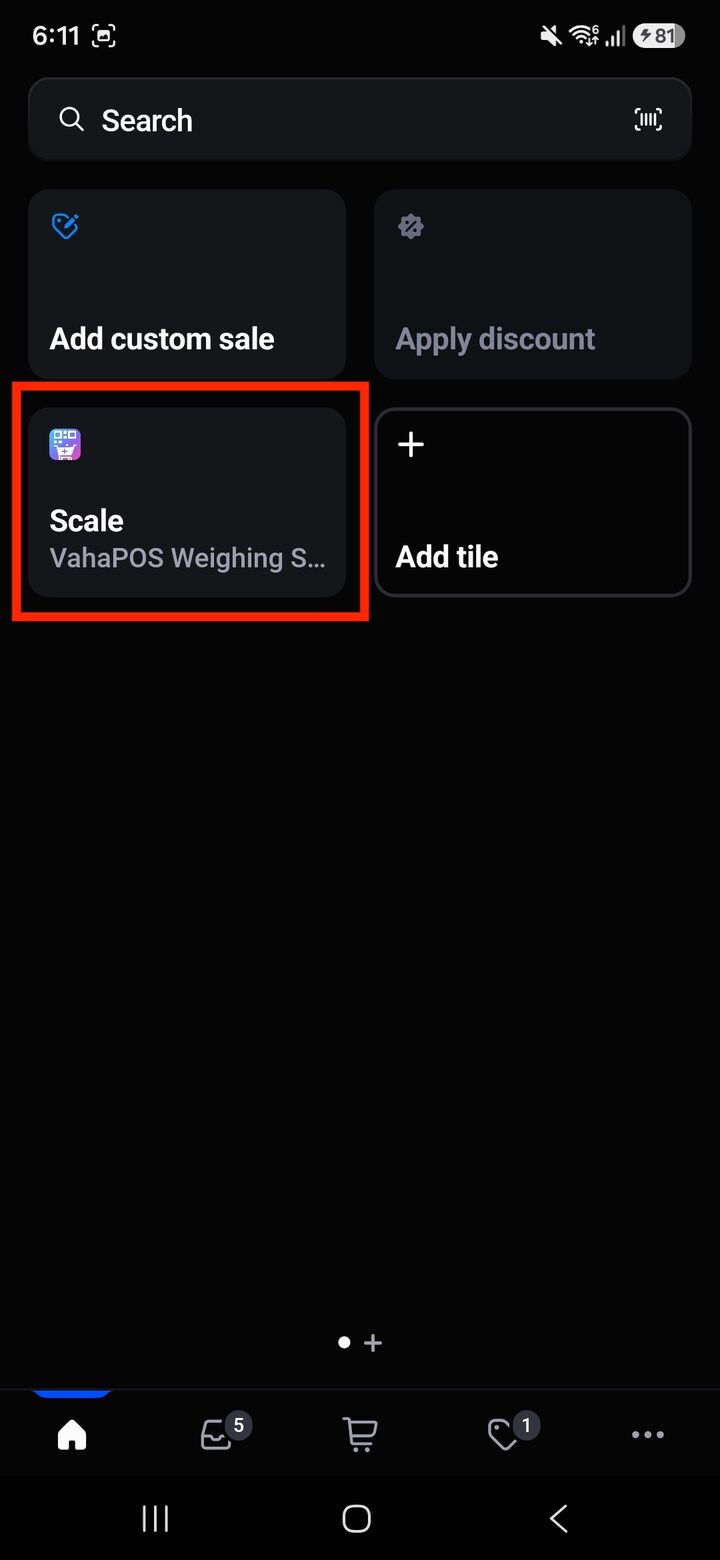
Step 2: Add the scale tile to Shopify POS
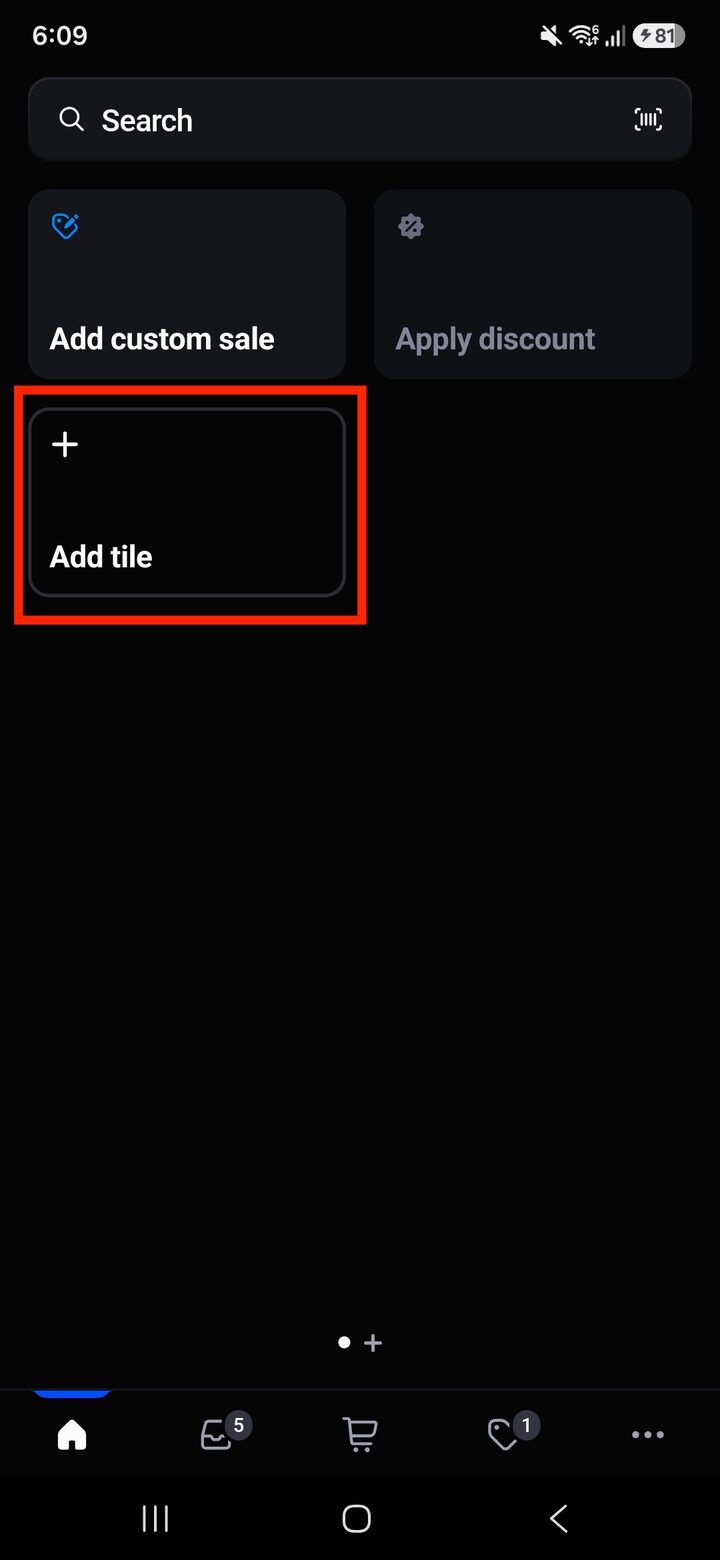
Step 1: On your POS device, tap Add tile.
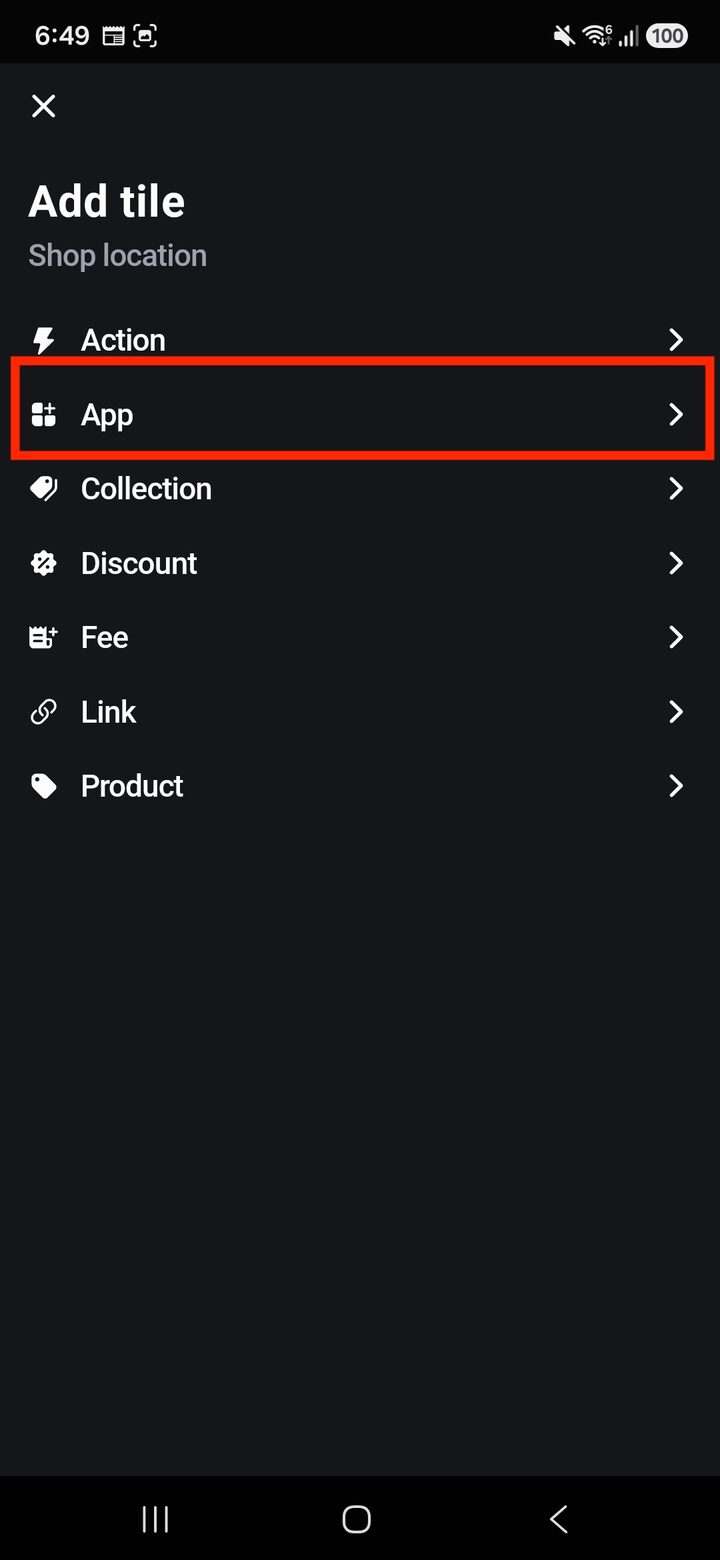
Step 2: Choose App.
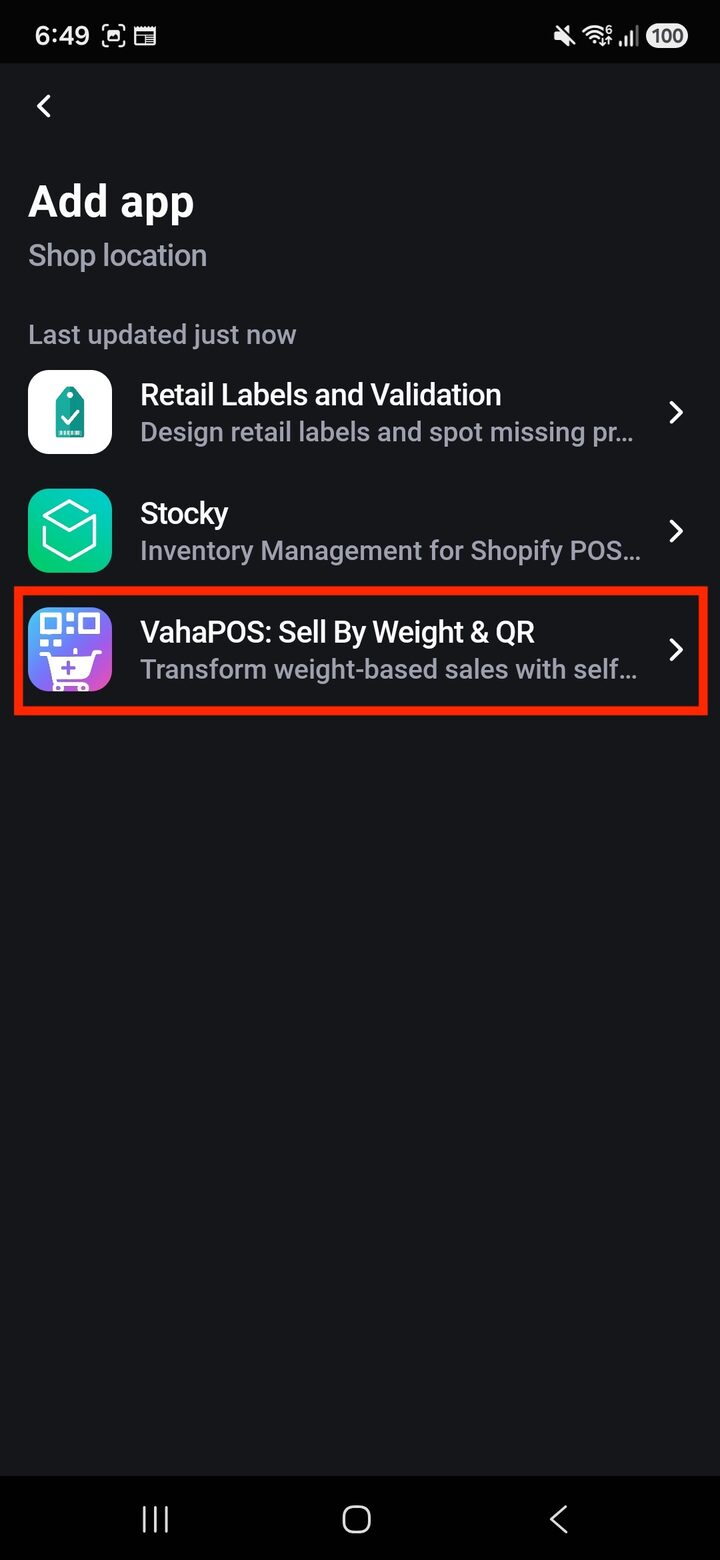
Step 3: Tap VahaPOS: Sell By Weight & QR.
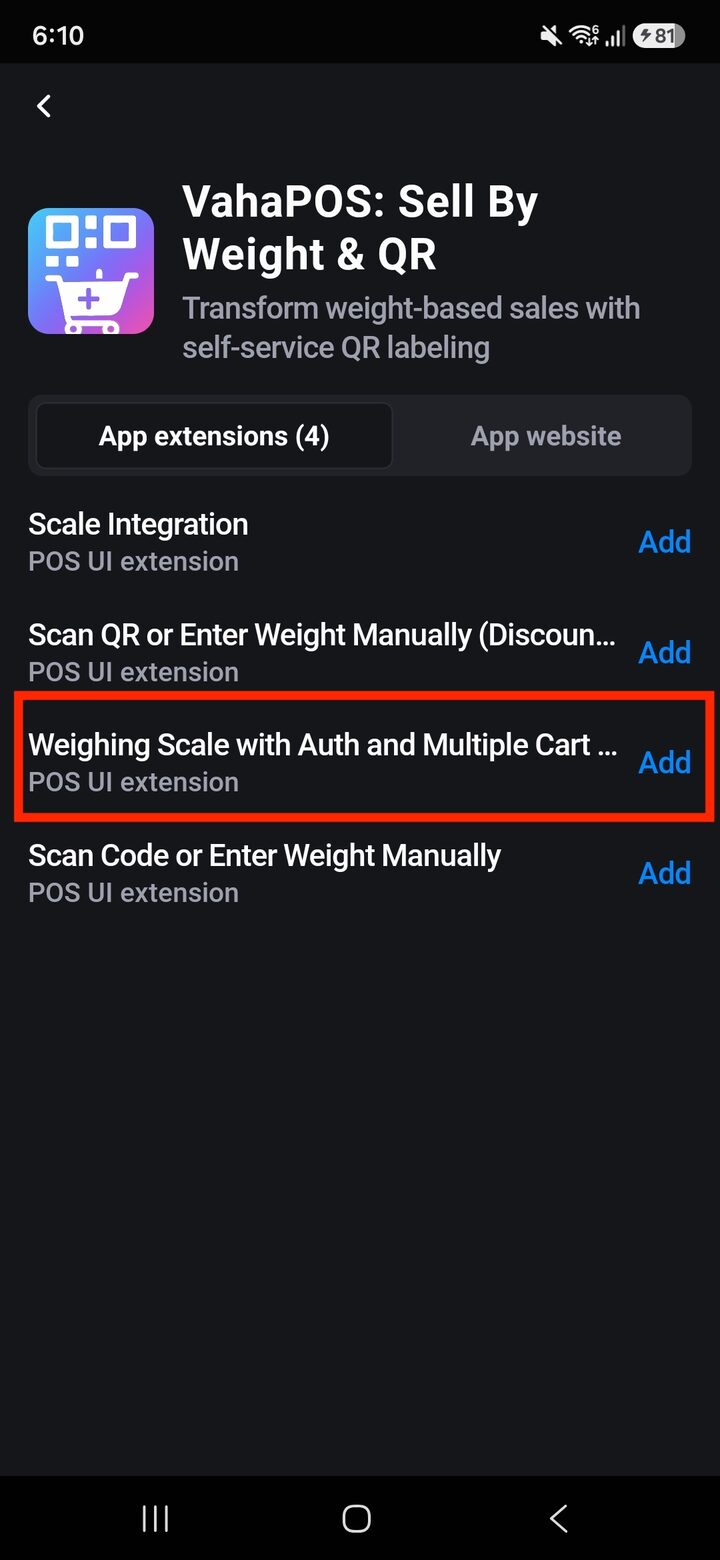
Step 4: Add Weighing Scale with Auth and Multiple Cart Methods.
Not Scale Integration. That is the older extension and does not pair with this flow.
Step 5: The Scale tile appears on your home screen.
Step 3: Pair the POS terminal
The code always travels from POS to admin, never the other way.
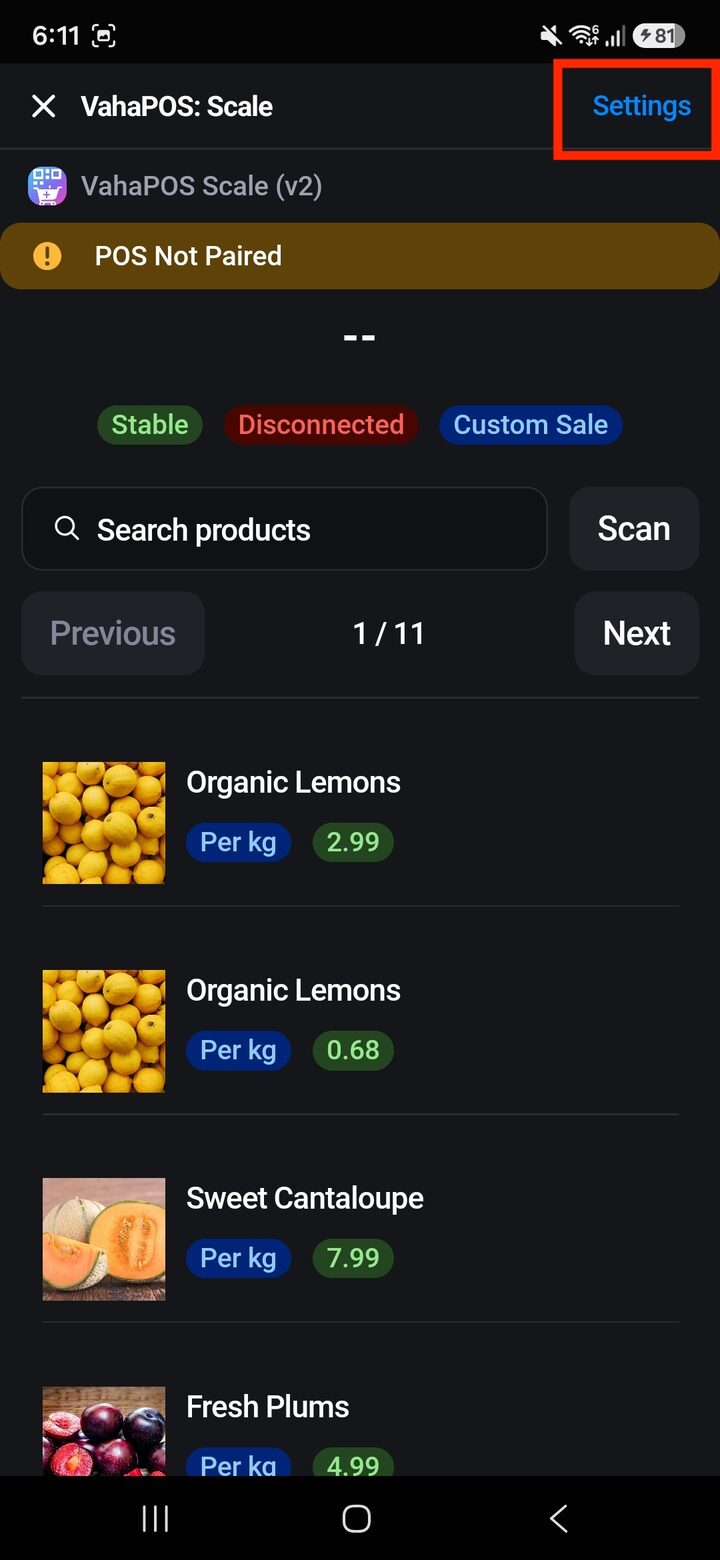
Step 1: Open the tile. It shows POS Not Paired. Tap Settings.
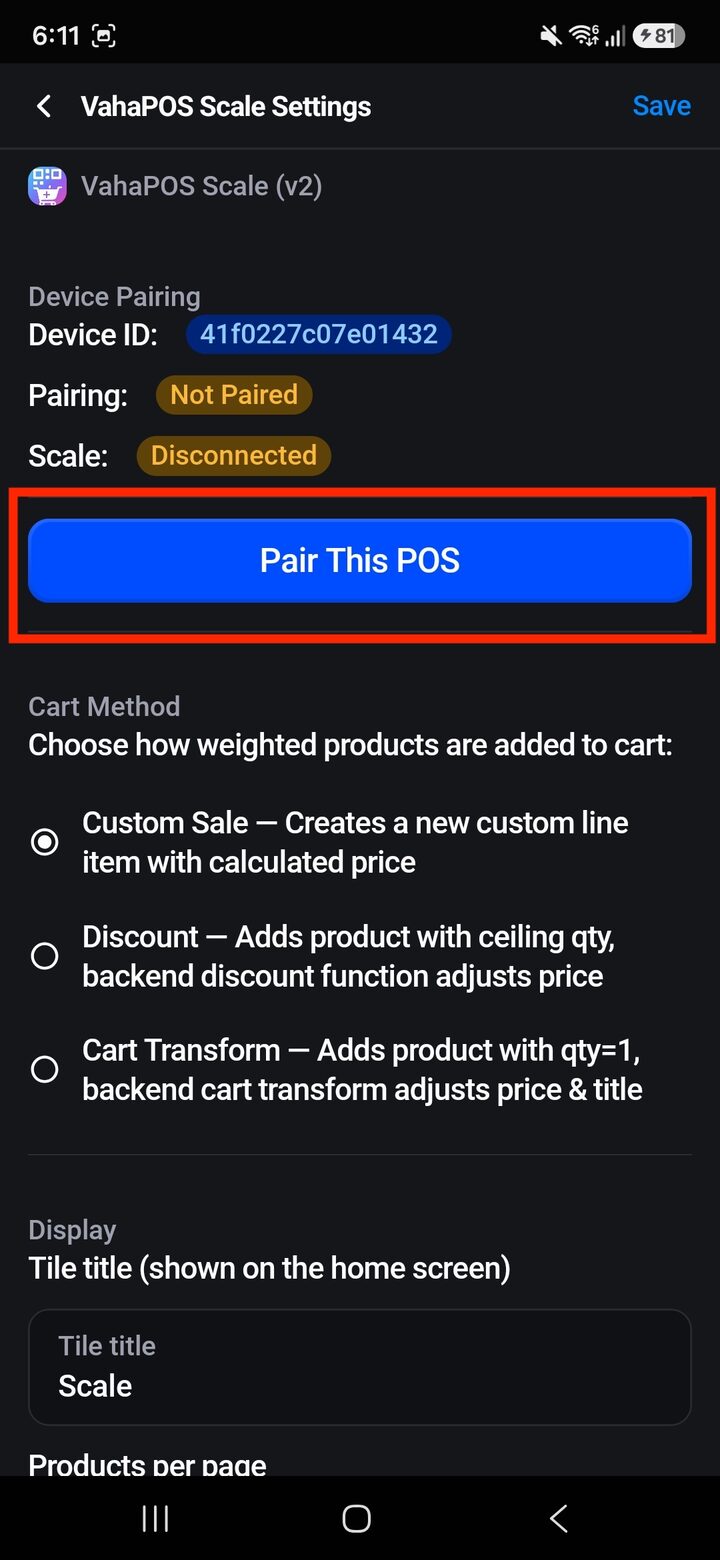
Step 2: Tap Pair This POS.
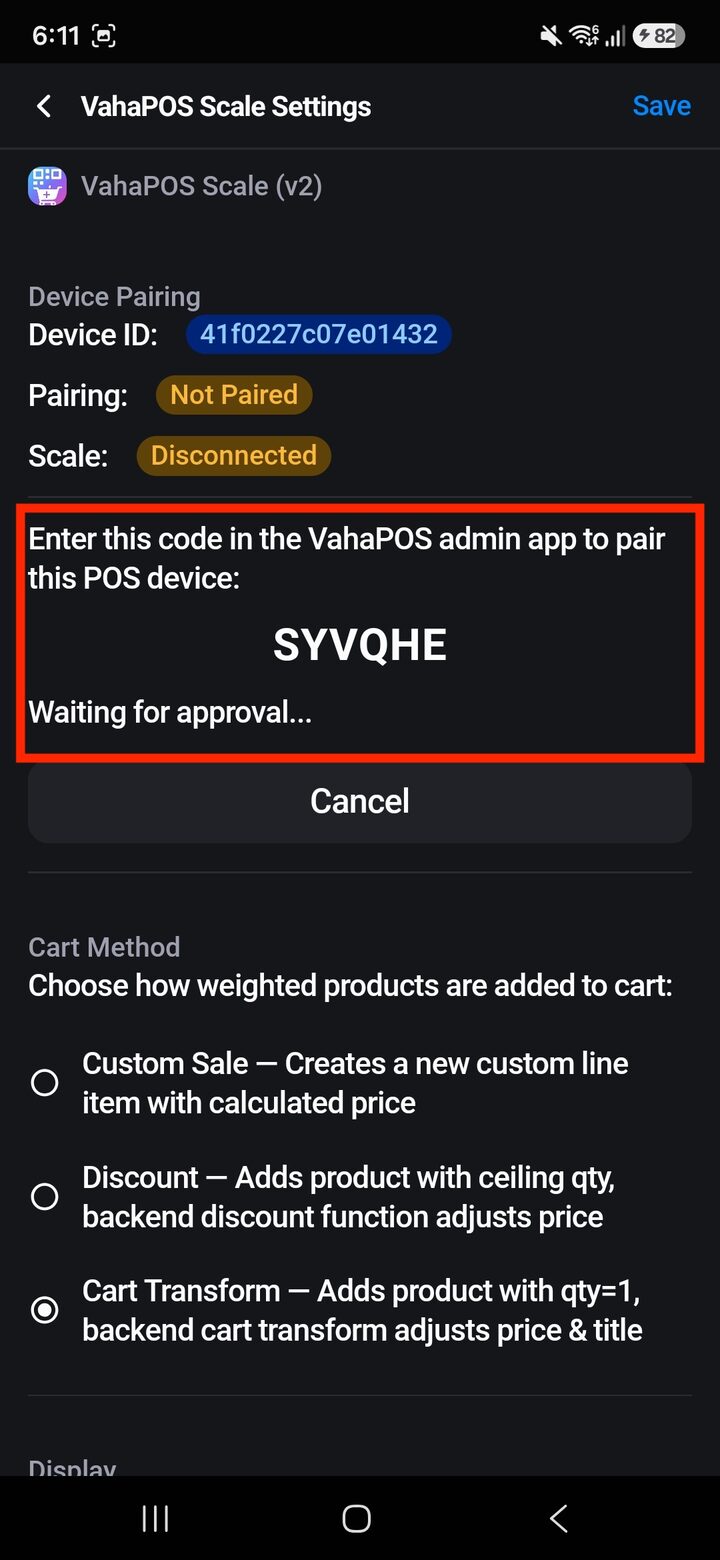
Step 3: A 6-character code appears and POS waits for approval.
The code is short-lived. If it expires, tap Cancel and start again.
Step 4: Type that code into POS Pairing Code in your admin, then Pair POS.
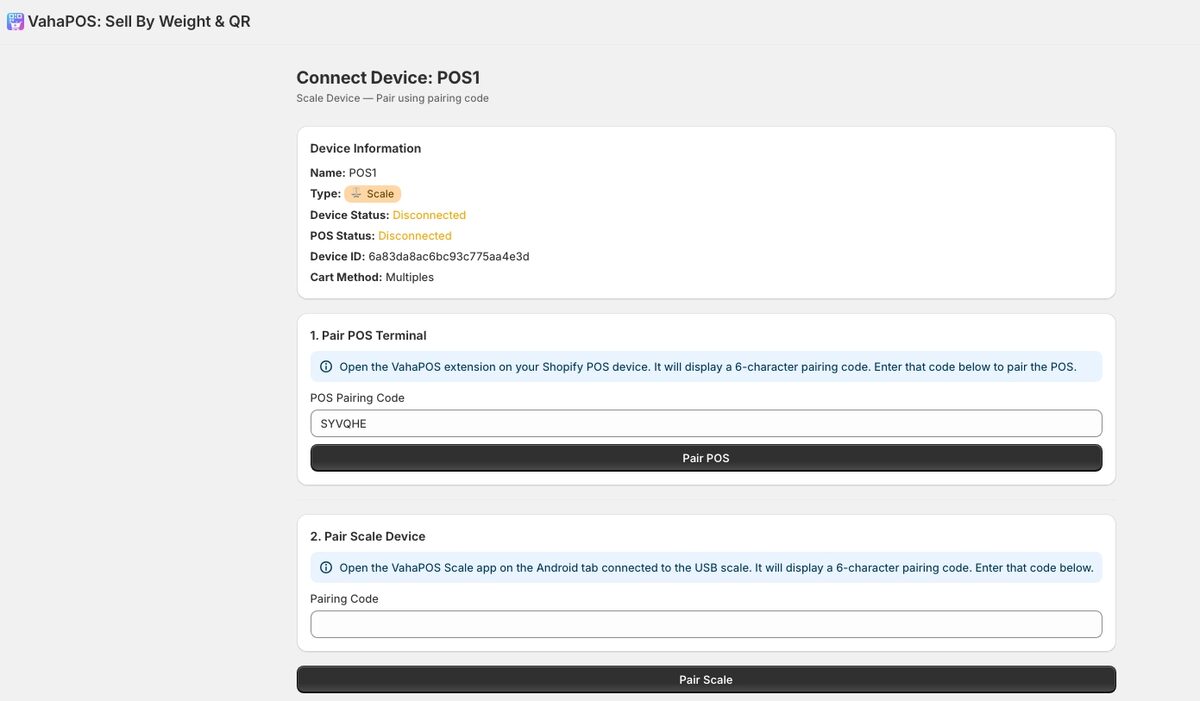
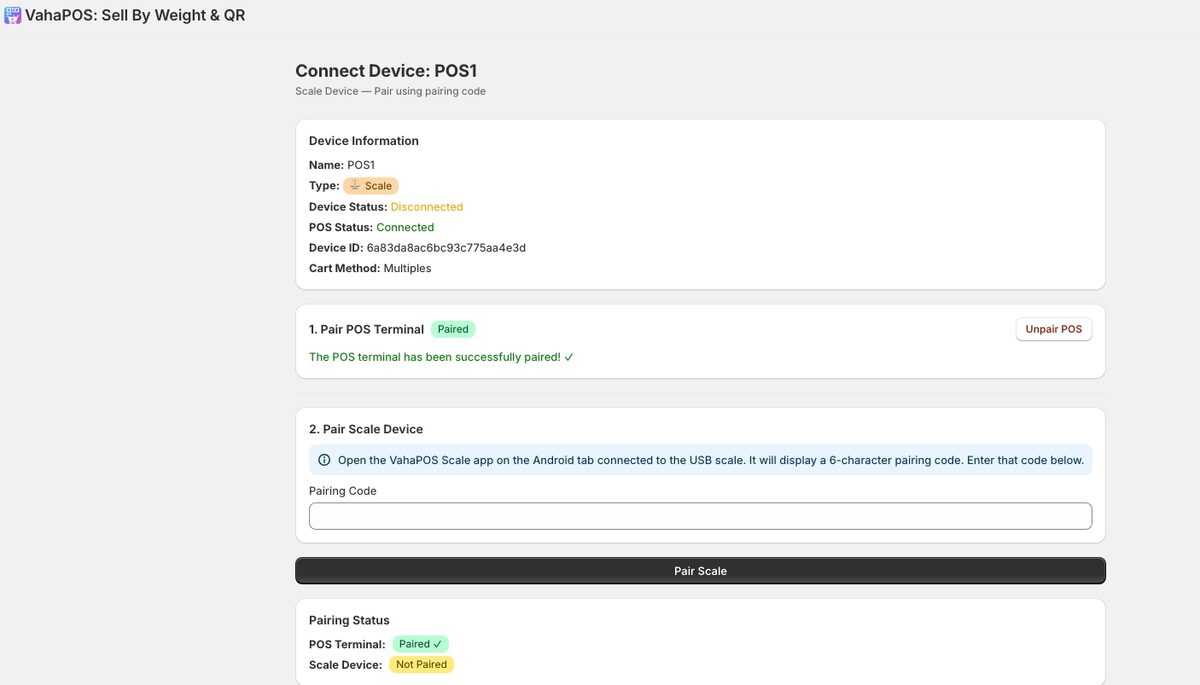
Step 5: The POS terminal shows Paired. The scale is still Not Paired; that is next.
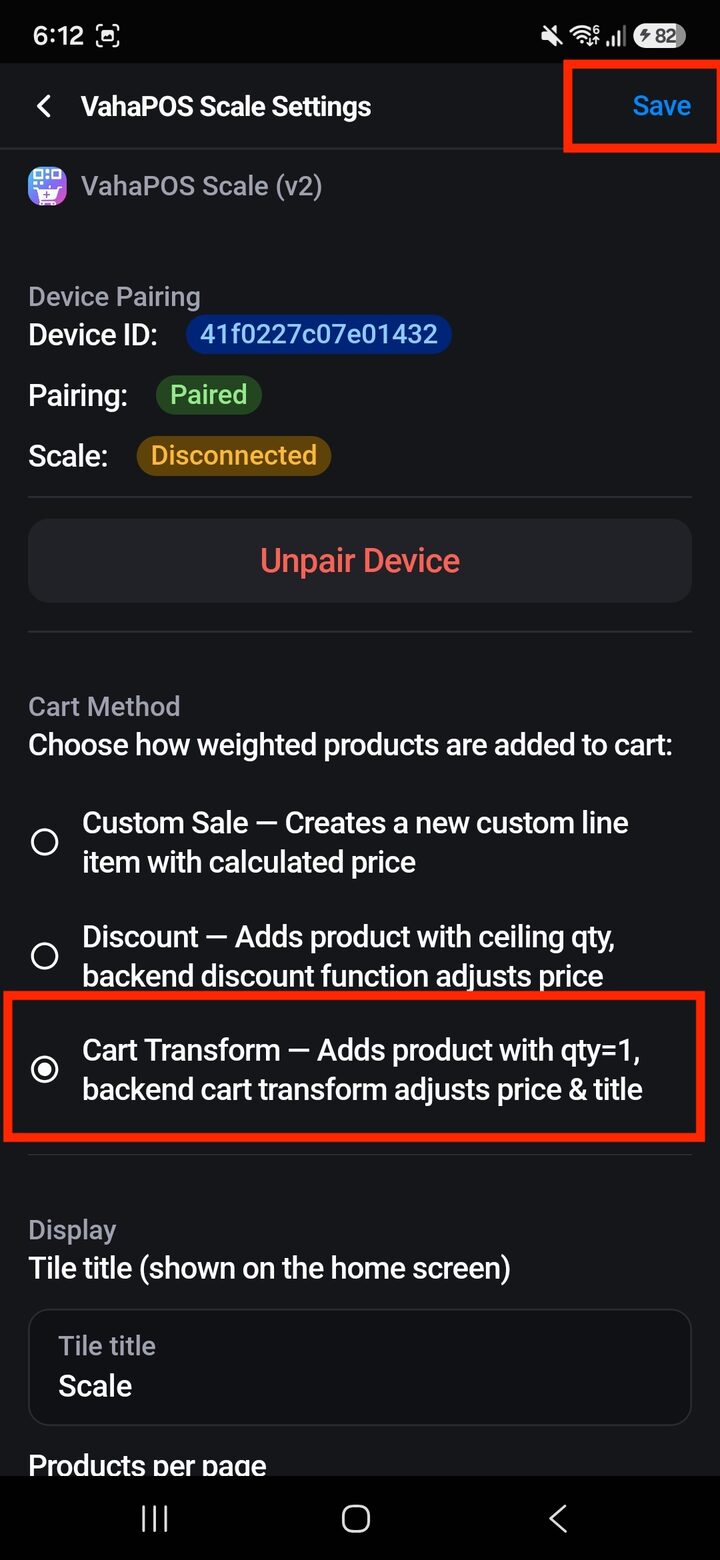
Step 6: Back on POS, choose your cart method and tap Save.
Cart Transform is the usual choice. See the cart methods table further down for the differences.
Step 4: Pair the scale device
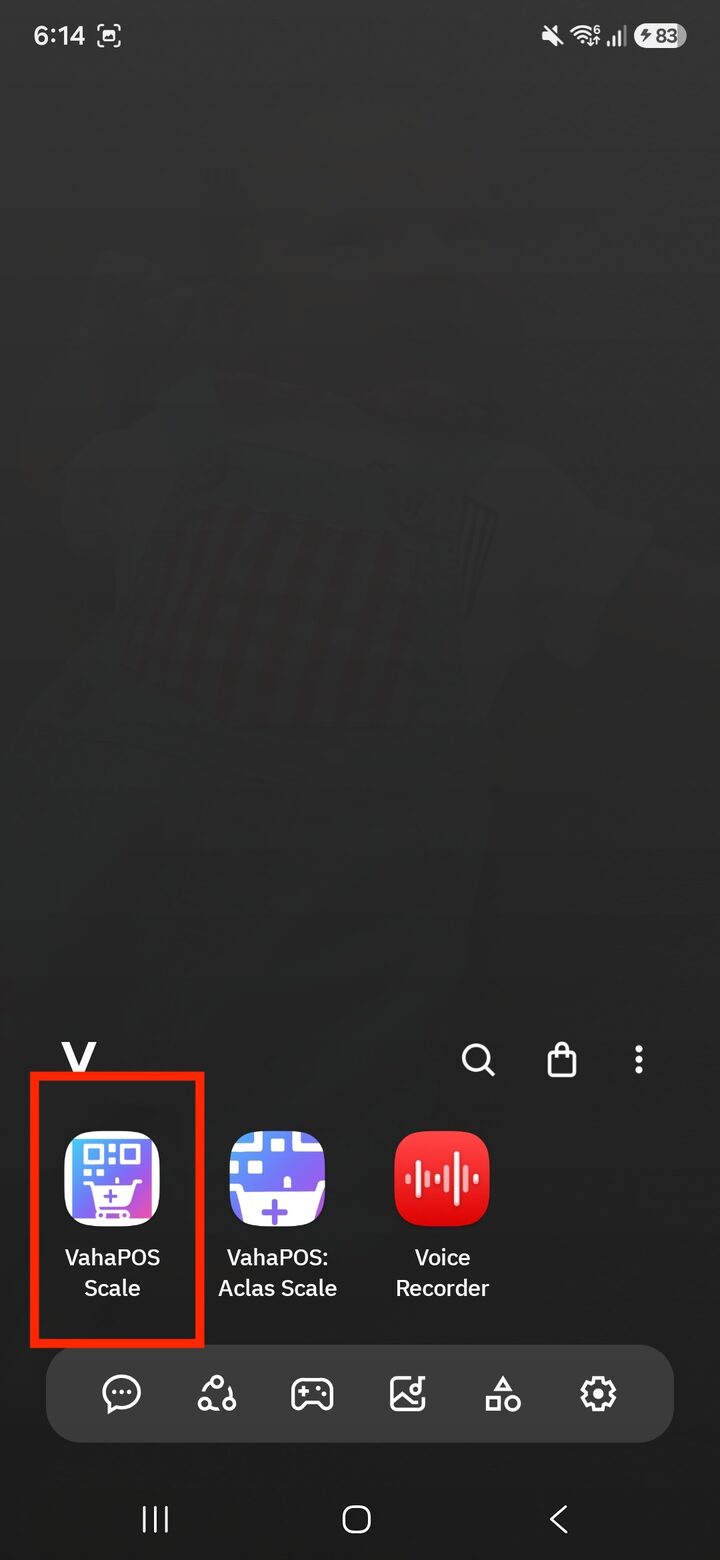
Step 1: On the companion device, open VahaPOS Scale.
Not VahaPOS: Aclas Scale, which is the kiosk app.
Step 2: The app shows its own 6-character code, with a countdown.
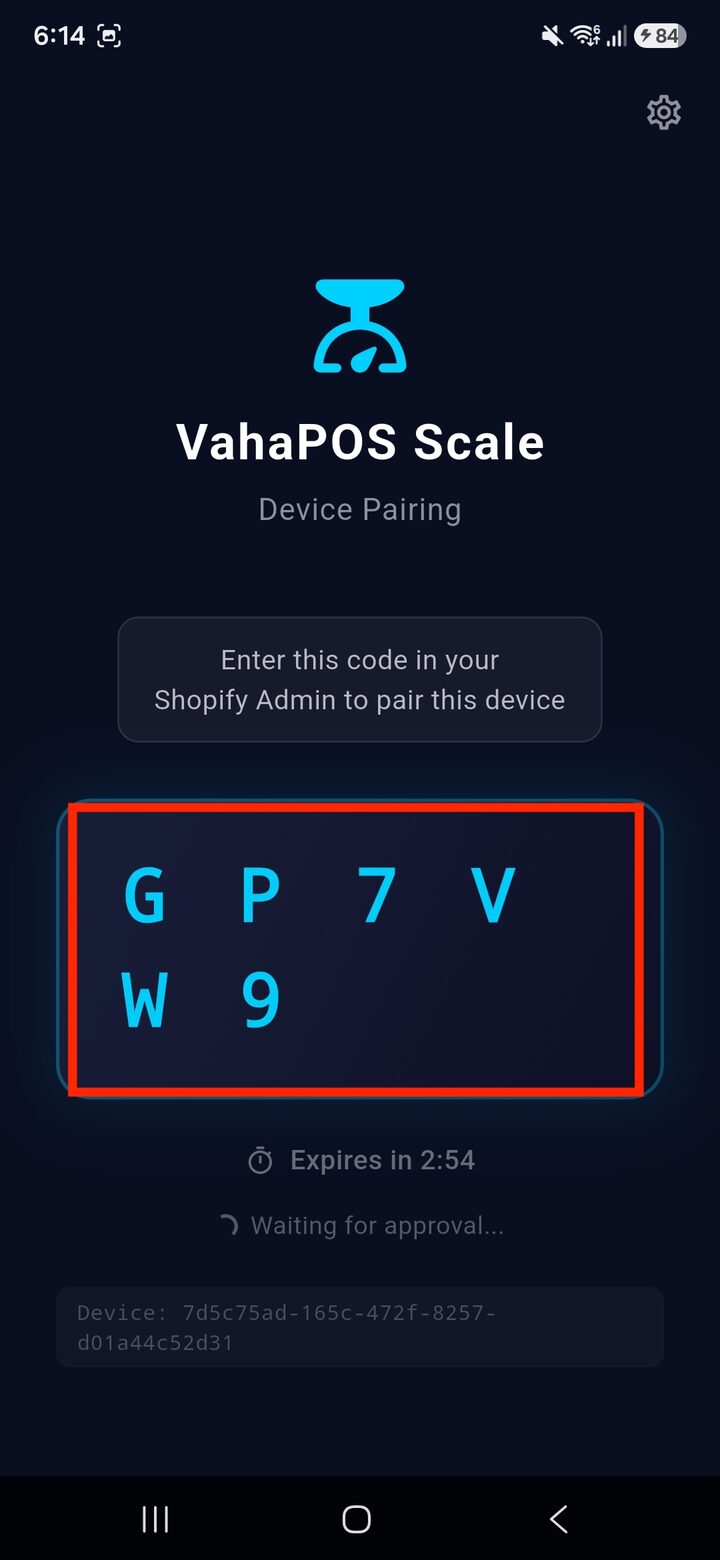
Step 3: Type that code into Pairing Code in your admin, then Pair Scale.
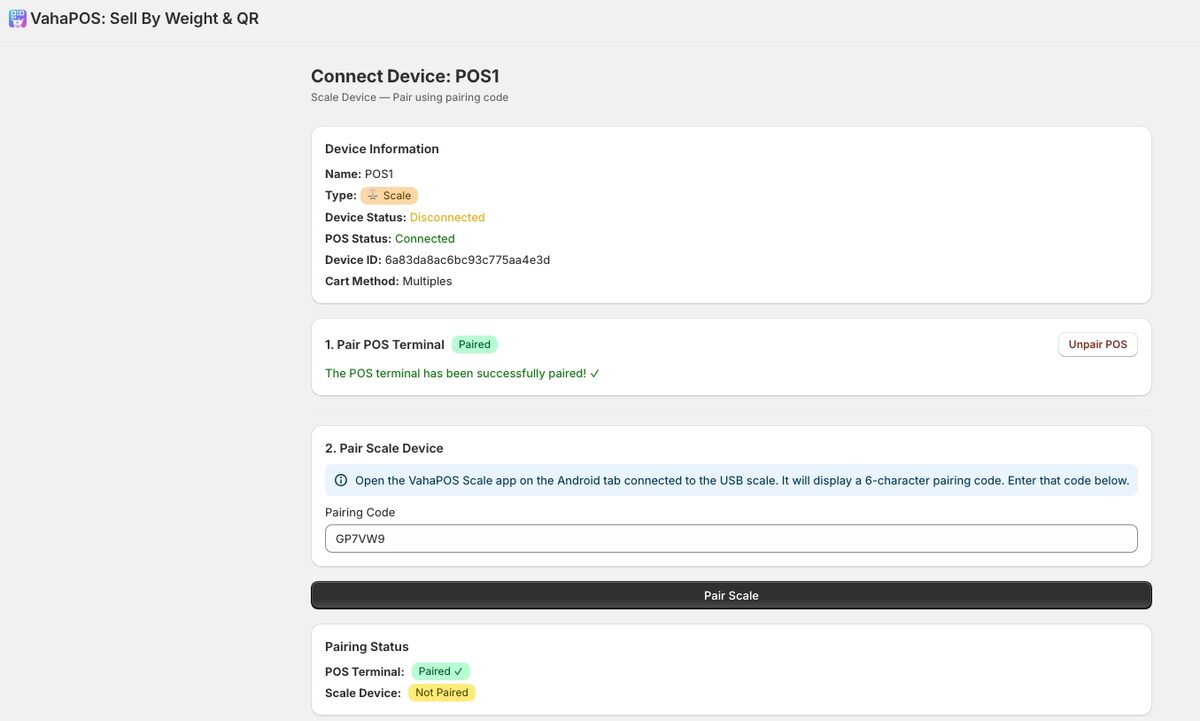
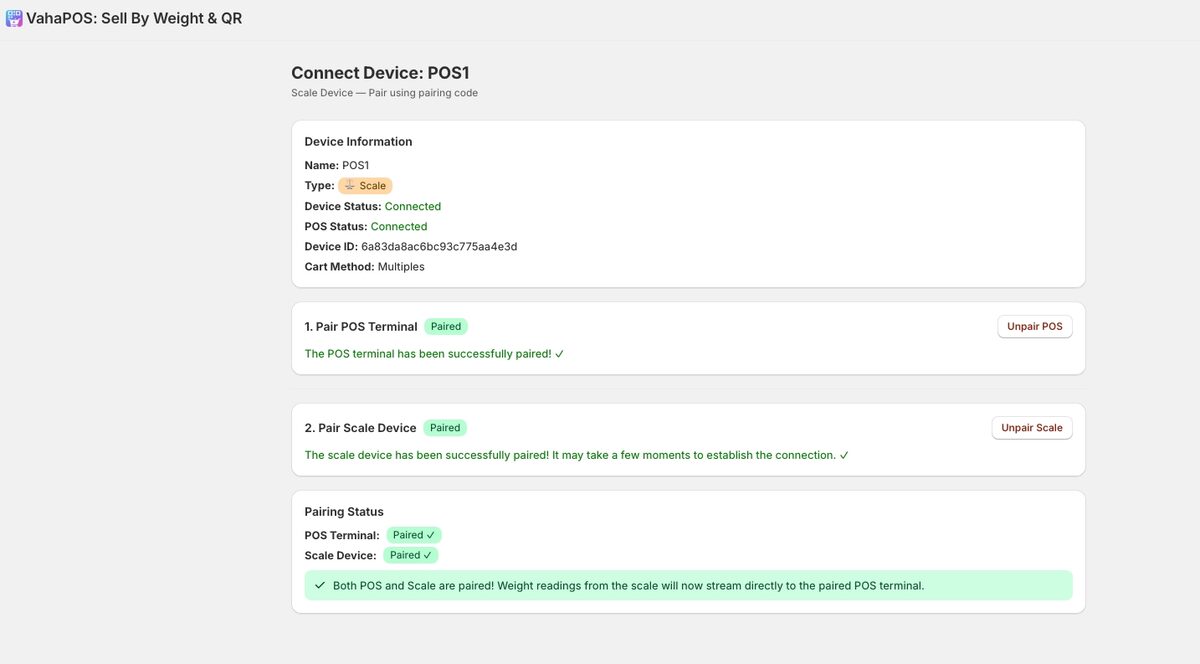
Step 4: Both now show Paired.
It can take a few moments for the connection to establish.
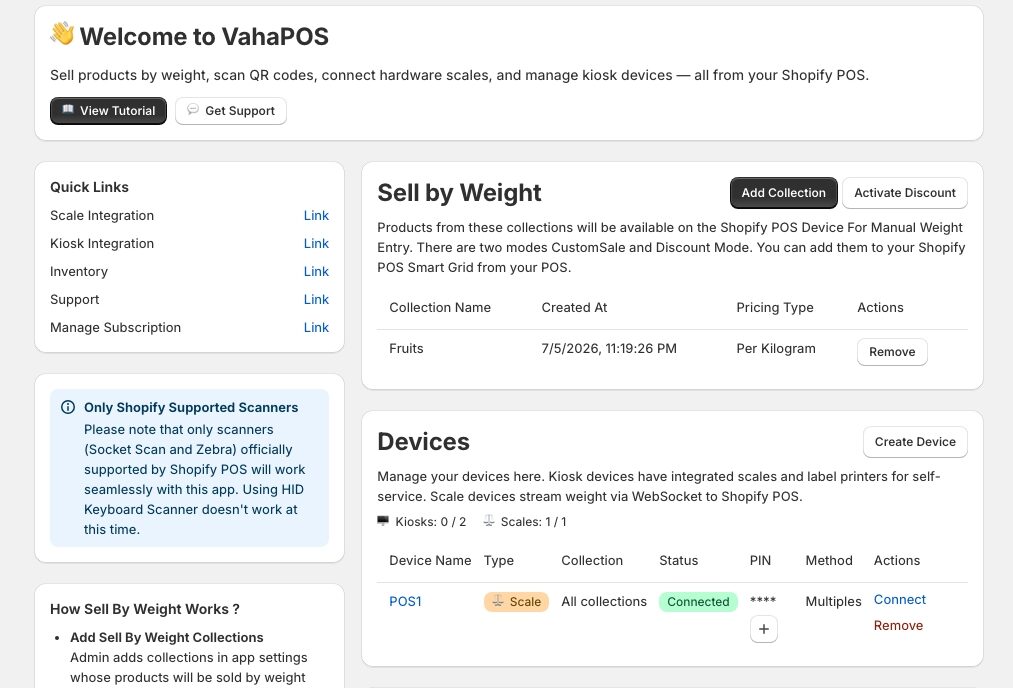
Step 5: Your dashboard shows the device as Connected.
Step 5: Connect the physical scale
Pairing links the device to your store. This step tells the app which scale is plugged into it.
Step 1: In the app, open the menu.
Until a scale is attached it reads Connect a scale to begin and shows No Scale.
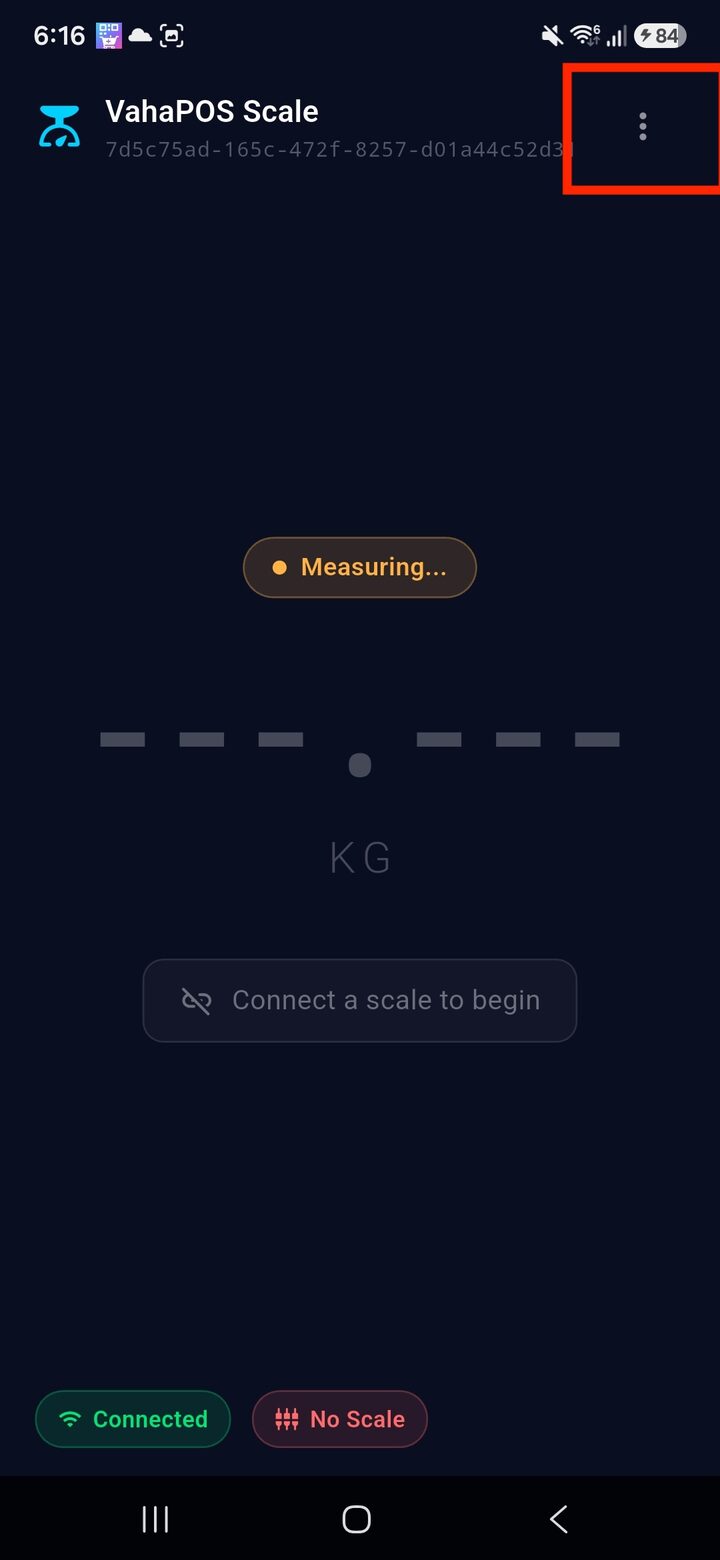
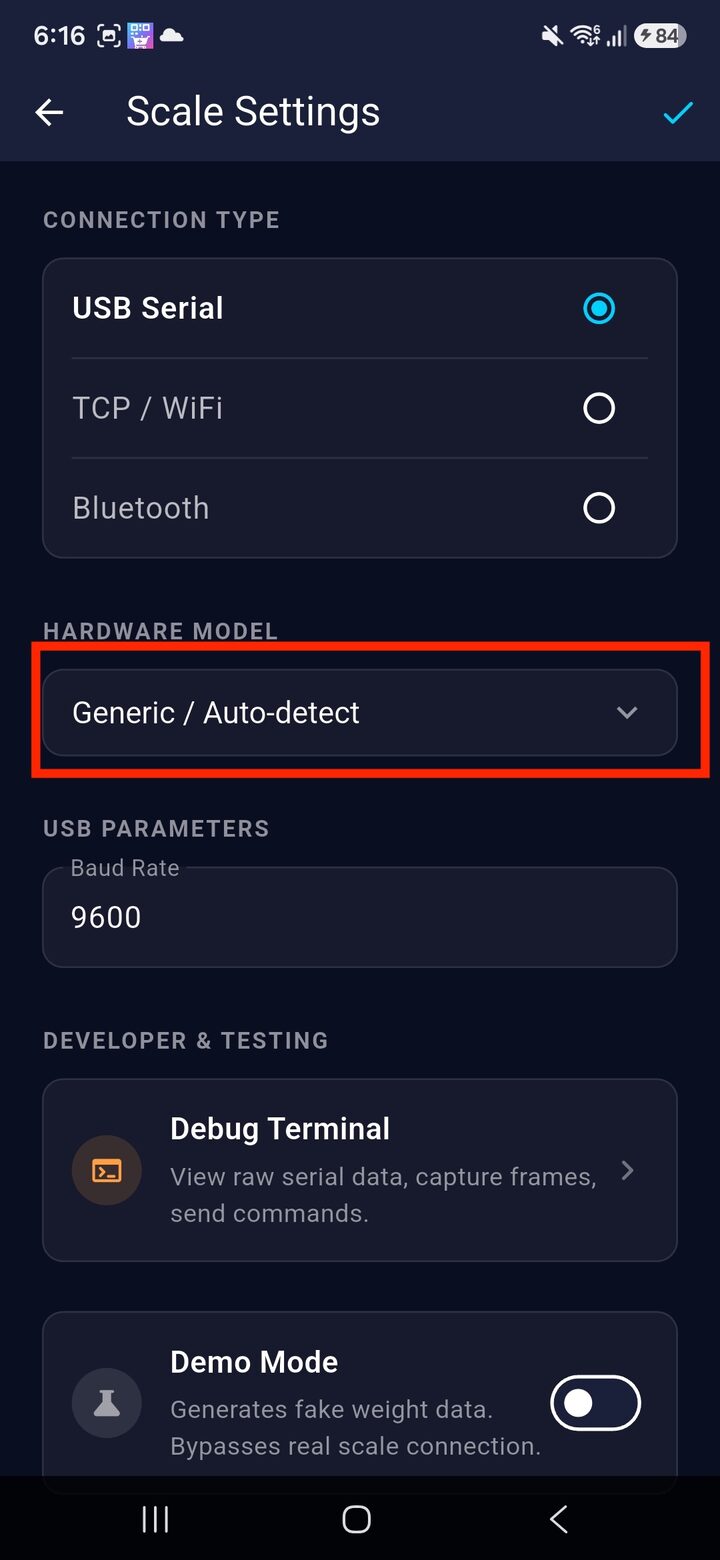
Step 2: Choose the connection type and check the baud rate.
USB Serial, TCP/WiFi or Bluetooth. Serial scales default to 9600 baud.
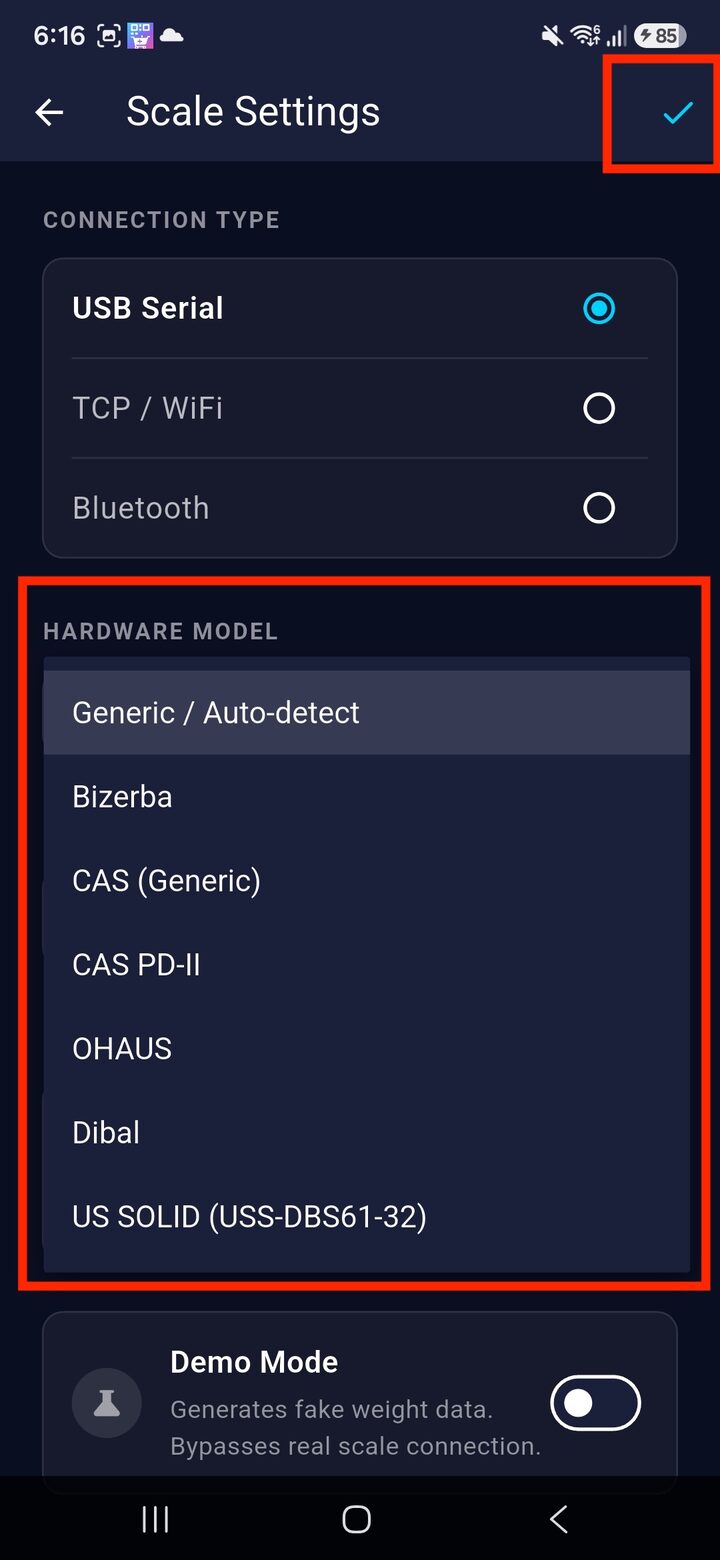
Step 3: Pick your Hardware Model and save.
Start with Generic / Auto-detect if your model is not listed.
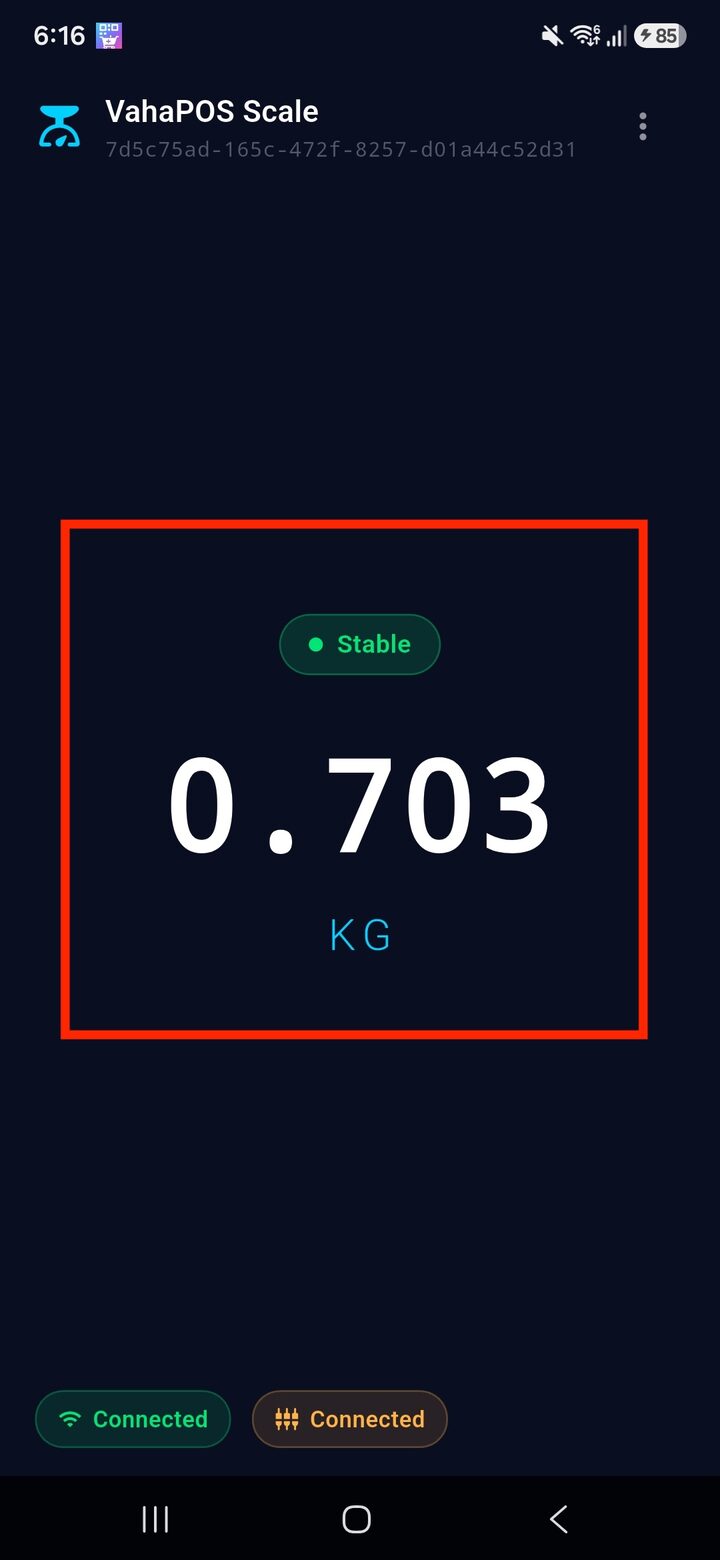
Step 4: Put something on the scale. The app should read Stable with a weight.
Both badges at the bottom turn green. Do not go further until this works.
If the app finds no scale on Android
- Confirm the tablet supports USB host mode (OTG) and that you accepted the USB permission prompt.
- Check the dock is powered. Some docks only pass data when plugged into mains.
- Recognised adapters are FTDI, Silicon Labs CP210x, WCH CH340 and standard USB CDC. Most USB to RS-232 cables use one of these.
Step 6: Confirm the weight reaches the till
Step 1: Open the Scale tile on Shopify POS. The live weight is at the top.
The badges show the reading state, the connection, and your cart method.
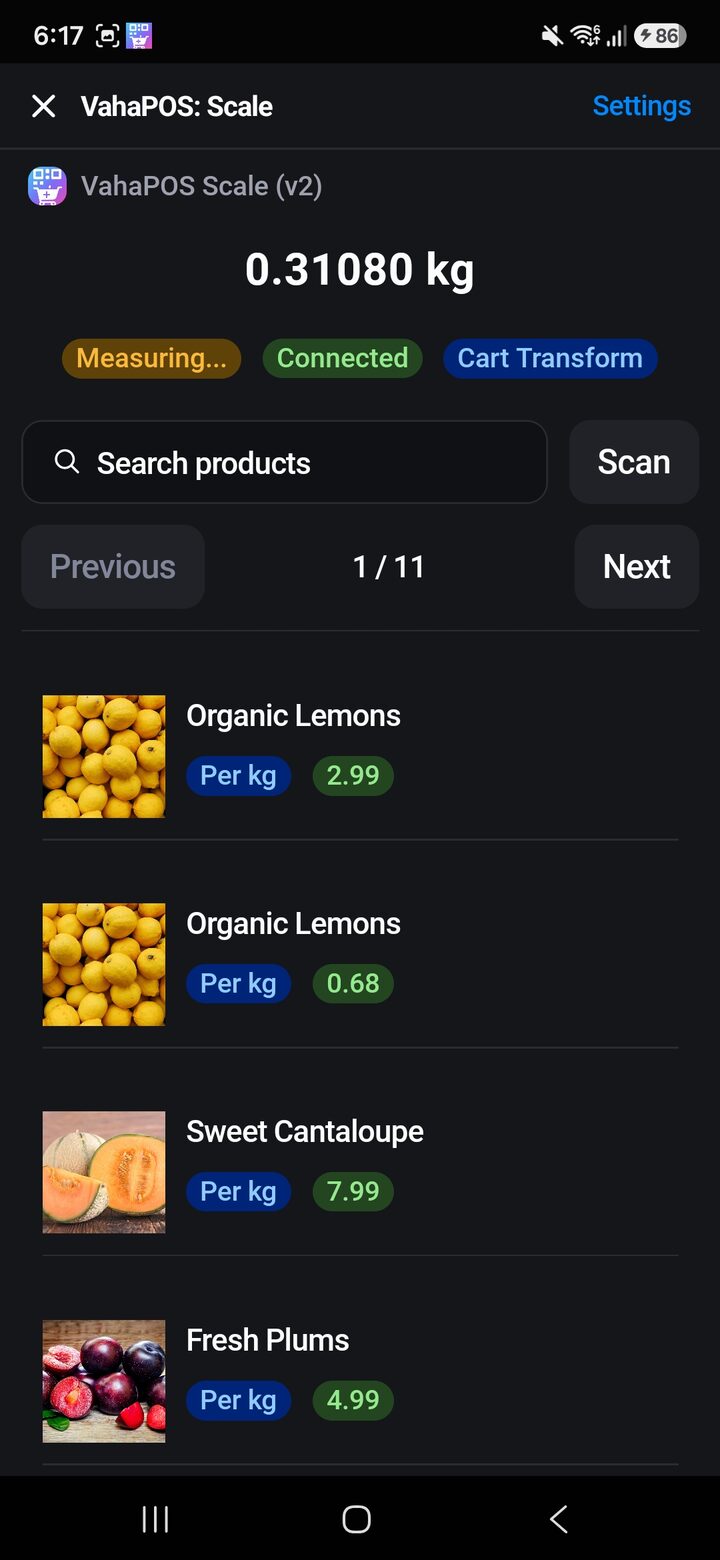
Serving a customer with a connected scale
Step 1: Place the empty bag or tray on the scale and tare it.
Tare on the scale itself. The weight passed to POS is what remains after taring, so packaging is never charged for.
Step 2: Add the product to the bag.
Step 3: Wait for the reading on the POS screen to settle to Stable.
Step 4: Tap the product in the tile. It goes into the cart at the right price.
Cart methods
Set in the tile’s Settings. All three produce the correct price; they differ in how the line item appears and what Shopify needs behind the scenes.
| Method | How it works | Best when |
|---|---|---|
| Custom sale | Creates a custom line item at the calculated price. | Simplest. No backend function required. |
| Discount | Adds the product with ceiling quantity; a discount function corrects the price. | You want the real product on the order. |
| Cart transform | Adds the product with quantity 1; a transform function sets price and title. | You want the real product plus a tidy line item. |
If something is wrong
| What you see | What it means |
|---|---|
| POS Not Paired | Step 3 is incomplete. Pair the POS terminal. |
| Scale Device: Not Paired | Step 4 is incomplete. Pair the scale device from the companion app. |
| Disconnected on POS | Both are paired but no weight is arriving. Check the companion app is running and has internet. |
| No Scale in the companion app | Paired, but no scale attached. Check the cable and dock, then re-check Hardware Model in Step 5. |
| No scale found on Android | Confirm the tablet supports USB host mode (OTG) and that you granted USB permission. Check the dock is powered. |
| Pairing code expired | Codes last three minutes. Generate a new one and enter it promptly. |
| Weight includes the bag | Tare the empty bag on the scale before filling it. |
| App asks to pair again | The stored token was rejected. Tap Retry to get a fresh code and pair the scale device again in the admin. |